Monday, December 17, 2012

Quick Christmas Card!

 Hello everyone! Sorry I couldn't get a better pic for this but I made this card using these wonderful card toppers! They come in a pack of 6 and I have used everyone in a different way! I love them!

 On this particular one I cut a piece of red card stock to cover the front of the card and inked the edges with distress ink. Added a ribbon on one side from my stash. Then I added some gold Stickles to rim of the curtains, tie backs, and flames on the candles. After adding Glossy Accents to the bows, and other various place I was done! Quick, easy and beautiful!
Thanks for looking! :)

Tuesday, November 27, 2012

Christmas Wreath

Hello everyone! It's beginning to look allot like Christmas around here! :)
I made this yesterday to hang on our door. Surprisingly, everything I used to create this came from the Dollar Tree! I love that store when it comes to crafting sometimes! :) Here's some close-ups...thanks for looking!

Wednesday, November 21, 2012

Wooden Christmas Frame


Hello everyone! I made this Christmas Wooden wall decor using the Graphic 45 Christmas Emporium paper pack.

I stained the wood with Tim Holtz Distress stain. After measuring the different compartments, I went through the paper pack and cut them to fit and matted some with solid colored card stock.

I made the bow using a green sheer ribbon and a thinner satin burgundy ribbon and tied it using my bow maker..
Just to add a little sparkle, I added some Distress Stickles and a gold star to this section as well as a stick pin.
This paper pack gives so many options on creativity. With just adding some gems and star buttons that I tied little bows on, this section is almost my favorite! :)
I bought this flower from my local dollar store and took it apart. I re-assembled it in reversed order and added a rhinestone brad and some Stickles to the center.
Thanks for looking and I hope this has inspired you to create and alter items for your home! :)

Other products used:
Cinnamon Stickles
Gold Stickles
Scor Tape
Glossy Accents
Glue Dots
Foam Squares
Distress Ink Pad

Monday, October 29, 2012

Merry and Bright!

Good morning everyone! :)
This will be my second year at attempting to make all of my own Christmas cards to give to family, friends and clients. This is what I like to call a nice clean and simple design. Very easy to make and fast!
I made this card (size A2) by cutting a 8.5x11 sheet of card stock in half. I then layered the green and red card stock and cut a piece of white card stock for the sentiment. The circles were punched and then stickers applied. The gems were applied with glue dots and after inking the edges of the card I was done! Quick and cute! I love making cards! :)
Here's a list of the products I used or variations you can find in our store, thanks for looking!
-Distress Ink
-Card Stock
-Gems
-Christmas Stamps
-Stickers/Die Cuts

Saturday, October 27, 2012

Cutters Creek Design Team Holiday Blog Hop!

Welcome to the Cutters Creek Design Team Holiday Blog Hop! We want you to hop along with us and play for some awesome Blog Candy. The objective for our Blog Hop this weekend is to provide some inspiration to help you get your holiday crafting underway! Our Design Team has come up with some fabulous projects and we have a little bit of everything, from cards to gift ideas, and home décor items. So we invite you to hop along with us and get your creative juices flowing!

I've decided to go with a home decor project that's easy, fun and fast!
I figured the holidays that are coming up are the ones that people most likely have parties and have family and friends over for dinner. You might not be able to tell by the picture but, that is a drink coaster I made from a ceramic bathroom tile! Isn't it cute?!?!? :) These are inexpensive at the hardware store and they come in a variety of colors, but if they don't have the color you want, you can always paint them! I love it!!
Here's some for when the family comes over for Christmas dinner! As easy as 1, 2, 3! And you don't have to stop there...
I made this one for my Kevin. Now he has a coaster to match his cup of his favorite team!
And of course I had to make at least one for myself! :) They make great gifts and you are only limited to your imagination! I hope this project has inspired you! Thanks for looking!!! :)


Here is the complete blog hop line up in case you get lost along the way:

Don’t forget to leave a comment before hopping along to Tees blog. Thanks for hopping by and we hope you enjoy the hop and get many wonderful ideas!

Monday, October 22, 2012

Crocodile Stitch Purse

The body of this purse measures approximately 12"x12". You can can order any color combination or style of handles. (more pics below)  The cost is $50 usd with a liner and $35 usd without a liner.


Sunday, October 14, 2012

Happy Halloween!

Hello everyone! Here's a quick and cute little sign I made to put on my front door for the Halloween season.

I know I've said it before, but I will say it again......I LOVE MY eCRAFT PURPLEBERRY!!!! :)
I was really stumped on what to create. When I came in the house yesterday and realized I hadn't decorated my door for the holiday yet, that's when it hit me to make a Halloween sign.
I used eCraft to cut the title and then I went from there. After layering the different color card stock, I used some Stickles-Black Diamond to add little dots around as a border.


 I downloaded and cut the little ghost and the jack-o-lantern. I also used Mustard Seed Distress Stickles to enhance jack's eyes and winning smile! The dangling spiders at the bottom of the sign is a piece of ribbon I received in a swap last year. I really like how this turned out and I had such fun creating it this morning! Thanks for looking!!!! :)

Monday, October 8, 2012

Sister Friend


Hello everyone! Here's a layout I did of one of my close friends using some scrap papers from my stash. Sometimes it's hard putting a lo together that did not come in  a kit, but it sure is rewarding when you can! :) Thanks for looking!


Sunday, October 7, 2012

Quick and Easy Christmas Card

Hello everyone!
Here's a quick Christmas card I made. It really didn't take me that long and with minimal supplies. Great time saver! :)
My goal was to design this to look like a wrapped present. The background paper is from my stash and I used Distressed Ink on the edges of the card base. After cutting out a couple of solid color strips of card stock, I used my eCraft Purpleberry to cut the circle and I attached my hand tied ribbon bow using Scor tape.
Thanks for looking! :)

Wednesday, September 19, 2012

Crocheted Puff Stitch Hat

Hey everyone! I just got back into Crocheting about a month or so ago and I have been having a blast re-learning old stitches and picking some new ones as well! Here's a hat I did from a tutorial on You Tube by Crochet Geek. I love her tutorials!
TFL! :)


Sunday, September 16, 2012

Double Breasted Pocket Card Tutorial

Hi everyone!
Here's a quick video tutorial for the Double Breasted Pocket Card front that I made. Thanks for watching...enjoy! :)


Some Products used:

- Ecko Park Country drive page kit
- Bazzill Cardstock
- Stickles
- Kaiser Kraft Rhinestones
- eCraft Purpleberry
- Foam squares
- Scor Tape

Sunday, August 19, 2012

In Loving Memory


Good day everyone! I would like to share a layout featuring a good friend of mine from high school that also became one of my clients at the salon. That's me standing behind her holding the mirror. :)
I love my eCraft Purpleberry not only because it's PURPLE, but I love those big circles I can cut without having to trace first! lol I inked the edges of the circle with Tea Dye and added some small gems.


Every flower used in this section is from the Color Me Crazy flowers except the rust colored ones. I love the Color Me Crazy flowers, because as you can see, you can make them any color to match your project! I added some Stickles to the edges and centers of some to enhance them a little.


I picked these flowers up from my local dollar store and altered them. I also added some Stickles to the edges of these as well.


I distressed the edges of my layers and inked them with Distress Ink. I used Tea Dye on the Core'dinations card stock and Mustard Seed on the pattern paper. I used the same technique on the strips I added using the pieces from the edges I trimmed off for the layered effect.

undefined
I had this label and ribbon in my stash and for a more creative way to add her nickname "Buttons", I added a couple of buttons to match.

Thanks for looking and have a good day! :)

Sunday, August 5, 2012

Summer Sisters!

Hello everyone! :)
Today I want to share a layout I did of myself and one of my sisters using the Country Drive collection by Echo Park

undefined
The 12x12 and 11.5x11.5 background paper is just a couple of pieces from my stash. I used my eCraft Purpleberry to cut a 8x8 circle from the Flutter By piece in the pack and then I cut a 8.5x8.5 piece of white card stock to border it.

The picture was taken a few summers ago but I'm just now getting around to scrapping it! This particular summer, we did almost everything together like we were teenager again!

 The Alpha Stickers and quote stickers that came with the collection works perfect on the cut out Journaling Cards in the pack...my handwriting is terrible! :) I used one of my Color Me Crazy flowers in the corner but left it white and just added a large gem I had in my stash and made a stick pin to coordinate. The little yellow bow is also from my stash.

All of the flower embellishments in this section is from the Color Me Crazy pack except for the green layer on the top flower. I used some markers to color the yellow and the pink flowers. The butterfly is one of the card stock stickers that comes in the pack. I applied it to white card stock then carefully cut it out. I bent the wings back slightly and used a foam square to adhere it to the layout.

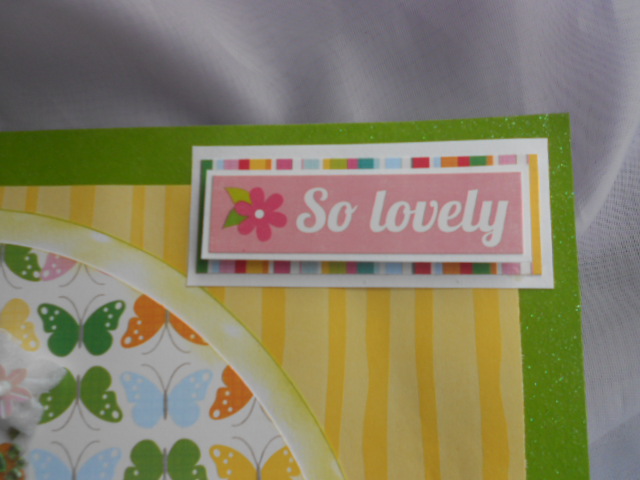
I created this using one of the element stickers that came in the pack. I adhered it to a piece of white card stock then cut it out to border it. I used the same stripped card stock from the pack named Apron Strings and glued it to white card stock  to create a border for this as well. I used foam squares to adhere the title to the stripped border to give it some dimension.

This picture has always brought back sweet memories of very fun summer I had with my sister and now I'm glad that I've finally scrapped it using such a bright and fun paper pack!

Thanks for looking! :)

Wednesday, August 1, 2012

Calling ALL Young Crafters!

Cutters Creek Design Team is please to offer you the opportunity to show off your crafting talent and have a chance to win some wonderful goodies too!!!

Our challenge to you is to make a project, any project and post it to our blog through the Mr. Linky below. Your project can be anything you want, a card, a scrapbook page. . . We would like you to use at least one product that is sold by Cutters Creek. The contest runs between August 1st and August 15th. We will draw one winner from each of the age groups below using Random.org and they will be announced here on August 18th. When posting your project to Mr. Linky please include your name and age so we can be sure we get you in the right group for the drawing.

Our age groups are:
1 to 7
8 to 11
12 and older

Want to see the prizes? They are awesome!!!!!!

Prize for the 1 to 7 age group


Prize for the 8 to 11 age group


Prize for the 12 and older age group


So get your creative thinking caps on and start creating. we are excited to see what you make. If you need help with posting your project to Mr. Linky please email me at deannamulder @ live.com


Kids crafting contest

(Submissions close in 14d 9h 55m)
Link tool by inlinkz.com

Saturday, July 21, 2012

Happy Birthday!!!

Hello everyone!
I made this card the other day for my cousin and she shares the love for the same color as I do, so it was a joy to make a card using purple!! :)

I inked the edges of a base white card with some purple pigment ink. Then I cut a piece of soft pink cardstock 1/4 inch smaller than the base card and used a emery board to rough up the edges and then inked those edges with a pink pigment ink. After that I layered a scrap piece of white cardstock with a  piece of pattern paper from my stash, then a piece of purple ribbon and added some Kaiser Rhinestones for a little bling.


Now I know I've done this flower before using my eCfrat Purpleberry, but she liked it so much on my other project that she asked could I make her one. This time I used purple, pink and white cardstock for the flower and jewel brad for the center.

undefined
After creating the flower, I adhered it to the card using 3D Pop Dots for some added dimension!
Thanks for looking and have a great weekend everyone! :)

Friday, July 20, 2012

My Sunshyne!!

Hello everyone! :)

I guess you would consider this a "layout" that I created of my youngest darling daughter Sunshyne. I wanted to create something to put on one of my walls in my scraproom, but I wanted to get a little more creative than the standard sizes and frames.


So I used my eCraft Purpleberry to cut out the black and purple flower shape that I used as my background.


In this close up, you can see where I used some Black Diamond Stickles to border the title "BEAUTIFUL", that I adhered using foam adhesive squares.


I used some Say it in Pearls as some corner bling. I replaced the original champagne colored bling with the purple rhinestones.


I used one of my purple makers to color these Color Me Crazy flowers to match and added a large gem I had in my stash to the center. I had allot of fun making this unconventional layout and my daughter loves it!
Thanks for looking! :)